These tutorials/ reviews are a
product of extensive reading, researching and lots of time spent on
making them. Please do not copy, or share on your page (for promoting the items in your shop) unless I give you permission to do so. Please
ask nicely....I won't say no...but you need to ask.... You can link it
on your blogs if you have used these tutorials...please share the link
with me when you do use these tutorials...I would love to stop by and
see what you have done!
There are still many questions coming in the email and I thought I better answer them here. I've linked up wherever I can.
Q :
First question is about embossing gun or heat tool..which one is better?
A: There is no good or bad. Each comes with its pro's and con's. Its a matter of personal preference. I own a
Marvy Uchida heat tool and I like it. But again, the fact that the on/off button is way far from where I hold it, I can't have a free hand while I'm using it. Plus its a has a bit more blast of air to it.
The Ranger Heat Tool on the other hand, is less noisy, silent, has a low blast of air (which means it will take a few seconds more to heat up and melt the powder) and the on/off button is located where you grip it. The only downside is, its a bit pricier. Had I known these differences before buying, I would have opted for the ranger heat tool, used a damned discount coupon.
Q :
My heat gun burned.
A : So did mine.. Reason, India uses a 220 volts power supply. USA uses 110V. Of course, your heating coil will burn. It will work for the first few minutes or seconds, but it will burn up. Solution? Use a STEP DOWN converter, a 220-110V converter. You'll get it at any electrical shop for around 200 bucks.
US appliances have wattage ratings marked on them and should be checked before using so that you can get the right converter.
This is what my converter looks like. The brand name may vary, but they're not big bulky things, nor do they cost more than 350 bucks. What have you all been buying for 1500 bucks?
ETA 20/04/2013 - This post is 2 yrs old. Now you have the European Versions of the Heat tools, that do not need any converter. Go for those.
Q :
What about embossing powders? Which is the best?
A : Again, there is nothing good or bad. Personal preference. I love
American Crafts Zing Embossing powders for their Clear powder. I also have the
Ranger Superfine detail which I don't like, but may work with detailed images. If its bold images, Zing works better.
I don't own any colored embossing powders, just basics, Gold, Silver, White and Clear and those are all I ever need. Gold and Silver I purchased from Ranger.
ETA 30/4/2013 - There are a lot more companies in the market now, especially
WOW powders, you do not need to use an anti-static tool with these powders. They come with some anti-static powder included in these..cheaper on the wallet too...just saying.
Q :
What about local heat guns?
A : I think you might get China made heat guns in the local market. You have to hound your local shops, especially the hardware stores for it. It's called the hot air gun and looks something like this, and should cost you around 400-500 bucks.
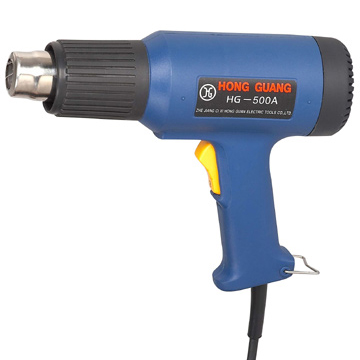
(Thanks Shalini/Juhi for this info)
ETA 30/4/2013 - These are easily available, usually found in sweet shops (they won't sell you but might tell you where to get it from) or in any mobile laminating shops. These are used to laminate the mobiles, laptops etc...but they are BULKY....so think wisely.
Q :
What kind of inks to use with embossing powder?
A: Any ink that is slow drying. By that I mean you can use
versamark, your pigment inks-
Brilliance inks (the ones from hobby ideas are pigment inks),
distress inks. Dye based inks will dry too fast for the powder to stick on it.
If you don't have any of this, simple glycerin will do. Yes, glycerin. Versamark is glycerin. Find a flat sponge, pour glycerin and stamp. You've got your own versamark. If its too thick, you can use some rubbing alcohol to thin it down.
Q :
What if I don't get a hot air gun/ heat embossing tool, can I emboss?
A : Believe it or not, you still can, provided you got a good wet ink, some embossing powder. And don't you dare laugh at me for the following funny ways of embossing I'm about to tell you. They do work (and us IndianStamper's live and breathe the mantra "
Make the best use of what you have"
1.
Use your toaster- Use your watermark ink to stamp the image, pour the powder. Then turn on your toaster, let it heat up (push the plunger to start the toaster) and hold the paper over the toaster. As it heats up, keep moving your paper to melt the powder. The stamped side will face up, towards you. Thanks Smita for this info.
2.
Use 60W bulb. Switch on the bulb, let it heat up. Stamp your image, pour the powder and hold it over the Bulb (2-4 cms up) With the heat of the bulb, it should melt the embossing powder.
3.
Iron. I used to use an iron when I'd burnt my heat tool. But its not easy to get the back side of the paper to touch the iron and not burn your fingers. Use a tweezer and a wooden stick to get the paper to actually touch the iron.
4.
On Stove : From Juhi - She has used a low heat of a gas stove to heat the embossing powder over the image.
This is my method - Put your flat Dosa tawa, heat it on high for 5-6 mins, switch off the gas, and put your paper on the tawa. Take a wooden skewer and press down the paper...as soon as you see the powder is melted, lift the paper off .
Q : Any additional tips?
A : Use an embossing buddy before stamping. If you don't have an embossing buddy, use
dryer sheets (anti-static sheets available in USA), I got half used box from my friend and one sheet goes a long way.
Of course, before you ask me, I have another version.
Find one of your old unwanted socks. Fill it with talcum powder/cornstarch. Close the end, and your anti-static bag is ready. Just pounce on your sheet before embossing.
Once you've used your anti-static method, avoid touching it with your fingers. The oils in your fingers will pick up the embossing powders. Use tweezers if necessary.
And some tips, I read on PaperFriendly's blog.
1. Keep your powder dry! Store powder in tightly closed containers or zip- plastic bags; place one or two silica packets from either vitamin bottles or shoe boxes in the container or bag.
2. Keep your paper dry! Paper is like a sponge and soaks up any moisture in the air (humidity, cooking, showers, etc.). Store paper in closed containers (drawers, plastic boxes, etc.) with some of those silica packets.
3. Keep your fingers off the paper! Handle paper by the edges as much as possible. Every finger or palm print is a powder-grabber thanks to the oil in your skin.
4. Inks containing either glycol or glycerin (pigment, embossing, etc.) dry slowly and are best used when thermal embossing.
5. After sprinkling the powder over the image, dump off the excess powder onto a piece of scrap paper that has a creased fold line. Tap the excess powder into the fold, then into the storage container or bag.
6. Turn the paper with the image sideways, and give the paper a good snap (third finger/thumb) on the back to get rid of any lingering EP. If you have a reasonably well-inked pad, and the image was evenly inked, there'll be plenty of EP on the image.
7.
Turn on the gun and let it heat up for a few seconds before aiming it at an area of embossing powder. Hold the gun four to six inches above the paper; DO NOT move the nozzle of the gun until the powder in that area has melted. Slowly move the nozzle to an adjoining area,melting that powder. Repeat until all powder is melted.
8. Don't overheat the powder. EP melts between 260 - 280 degrees; If the powder doesn't melt the way it should, chance are good that moisture, not the powder, is the culprit. Heat both sides of paper with a heat gun before stamping if you're having moisture problems.
Phew, that took me a whole day to do it.Any more questions, ask away!
 What ever needs to be embossed, goes under the peg...so that it does not fly away...
  And how it helps...when you're heating from top, the foil also gets heated and heats the paper from below...making the process of melting your powders faster....Its such a relief to have them melt faster....plus with the cardboard under it I don't melt any of my surfaces!!
  And your work gets done in half the time!!! just showing my pretty peg pins!!
  I would recommend this heat gun any day, its small, versatile, and makes so less noise than the other heat guns...plus this version works on the Indian voltage!! What more do I want!!


