Showing posts with label Info Post. Show all posts

Thursday, January 25, 2018

All you need to know to buy the Perfect Paper Trimmer!


ETA: This was my editorial article which was published in Our Idea Book Issue 3, which came out in November. If you haven't got the Issue 3 or any previous ones as yet, please do grab a copy, there is lots more amazing articles in the book .Buy here .

       Of the many tools in a paper crafters kitty, one of the most important is a paper trimmer. Without it, your papers are wonky, the matting is never straight, and as such you waste paper trying to get it perfect square or rectangle.

And always I have found questions, which one do I buy? How do I select from the many many trimmers, the perfect one.

First let me tell you about the types of trimmers that are available and then I shall tell you how to choose one based on your needs. 

1.       Simple Blade Trimmers:

Image from Google Image Search


    These are the most widely available trimmers. They are the most economical when it comes to price and are definitely most portable. They are made usually of lightweight plastic. These are recommended mostly when you are traveling for crafting retreats.
The blade is situated in a track or grove on the trimmer which you just have to slide up and down to cut the paper.
These are useful for light weight papers and cardstock.
The only downside is the constant replacement of blades. As soon as the blade starts getting dull, the cuts will start feathering. 
Recommended brands ( I personally do not like any of the blade trimmers) : Fiskars SureCut

2.        Guillotine Trimmer:

Image from Google Image Search

These trimmers have two long steel blades which act like scissors. One blade is fixed on the trimmer, while the other is fixed to a handle which moves up and down. In a scissor both arms move, here only one arm moves.
These are heavier and sturdier to use. It gives a cleaner cut and the blades usually are self-sharpening. With every paper cut, when they slide against each other, they self-sharpen.
These are good for any cardstock, multiple sheets of printed papers, Glittery paper, foam, light weight chipboard (Max1- 2mm thick)etc.
Cutting heavy chipboard will usually displace the pivot of the cutting arm and your cuts will go wonky or be off by a millimeter or more.
These need to be handled safely in case kids are around, due to the cutting action.
Some trimmers do have a handle lock, but not all. 
Recommended brands :Tonic (Most recommended) Swingline, Xcut, Dahle, 
(I will not recommend the cheap China made ones since there is no guarantee to the straightness of its scale..The arm may cut well, but if the scale is wonky, you papers will be too)

3.       Rotary Trimmers:

Image from Google Image Search

Image from Google Image Search

These trimmers have a rotary(round) blade which slides up and down a rail at the edge of the trimmer. The blades are housed in plastic carrier so it is impossible to hurt yourself while cutting papers.
These are most sturdy form of paper trimmers as well being able to cut multiple sheets of paper at a time, including heavy chipboard.
Blades do not need to be replaced as often as in Simple trimmers. Some are self-sharpening when the blades are at the edge of trimmers, eg :  Cutterpillar, Rotatrim.
These are sturdier than all other trimmers. The blades that come housed on two rails are the highest quality in Rotary trimmers as the blades have more stability while cutting. 
Recommended brands: Fiskars Procision, Cutterpillar, Dahle, Rotatrim, Carl, Fiskars Surecut rotary trimmer.

 
4.       Trim and Score Board
Image from Google Image Search
 These are the new types of trimmers, which have a scoring board built into the trimmer thus eliminating the need for an additional scoring tool. However, most of them are the simple blade type trimmers and thus need a blade replacement every 3-4 months depending on usage.
These are advised only for travelling or for crops. Not recommended for regular usage.

How to choose the right paper trimmer SIZE
1.    Size of material to be cut
·         Are you a paper crafter, a scrapbook maker, a mixed media artist, a quiller?
Do you need to cut 6x6, 12x12 sheets or bigger than that?
·         If you make only cards and cut smaller than A4 size papers, a smaller trimmer would work fine. Generally smaller trimmers are 8.5 x 5 inches
·         If you have to cut 12x12 sheets for scrapbooks, quilling strips, looking at a 12x12 trimmer or a trimmer which has a foldable arm would be good option for you.
·         If you use papers bigger than 12x12, you need to get trimmers which are bigger in length. Trimmers go upto 15 inches, 18 inches, 24 inches and more. The width of these long trimmers may stay about 12 inches. These are usually commercial paper trimmers, used in offices or Book binding stores for cutting bulk papers quickly.

2.       Look at the space you have
           Sometimes spaces are a big constraint. 12x12 trimmers take a large footprint in your room.
If space is an issue, you can go for foldable trimmers or smaller trimmers which have extendable arms.
Foldable trimmers are full 12x12 and fold up in half from the 6 inch mark.
The extendable ones are about 12x 6 and have extendable arms upto 12 inches.


How to choose the type of Trimmer – Blade, Guillotine or Rotary.


1.       Look at the material you wish to cut
·         If you are going to cut only cardstock paper, patterned paper or quilling strips, a simple blade type cutter should work for you.
·         If you have to cut heavier cardstock, glitter papers or mulberry papers or thin chipboard about 1-2mm, you will need a guillotine cutter.
·         If you have to cut more sheets of cardstock, heavier chipboard upto 4mm..prefer a Rotary trimmer. They cut chipboard the best. 

2.       Frequency of cutting
It also will depend how much cutting you do. Are you a crafter who does crafting for bulk order or a hobby crafter who needs it few times a week?
·         If you do bulk, you can definitely invest in the heavier and higher priced rotary trimmer variants as they have sturdier blade and last long.
·         For a hobby crafter, the mid-range trimmers will work well, especially Guillotine style trimmers.

 3.       Budget
I have put budget as the last thing to look for, because when you need quality tool and something that is long lasting, don’t look at the budget. Get something that is sturdy and long lasting and it will pay for it itself in the long run.
Economical trimmers end up costing you much more than they are actually worth. Either you need to keep replacing blades or the grove wears off and then you end up spending more on replacement parts ultimately costing you much more than what you paid for it.
 
 
Major differences between Blade, Guillotine and Rotary Trimmer

Blade Trimmer
Guillotine
Rotary

Type of blade
Thin V shaped blade in a plastic holder
Long blade along the cutting arm
Round blade in plastic casing
Life of blade
3-6 months
Lifelong (Self sharpening)
Lifelong (self-sharpening)
Frayed edges
Yes, when blade starts getting blunt
Never
Never
Cutting into middle of paper
Yes
No
No
Materials it can cut
Plain paper, patterned paper, cardstock.
Plain paper, patterned paper, cardstock, heavy cardstock, glitter paper, foam, handmade paper, thin chipboard (1-2mm)
All of the guillotine Plus heavy chipboard 2-4mm
Weight of the trimmer
Lightweight, portable
Heavy
Heavy, needs dedicated space in the room.
Brands available
Fiskars, Martha Stewart, We are Memory Keepers, Cricut, American Crafts etc.
Tonic Studios, Fiskars, Martha Stewart, Swingline, Dahle, Deli (made in China) etc
Cutterpillar, Fiskars, Dahle, Rotatrim, Carl, X-acto, Wescott etc.

To sum up:
  • Any serious crafter needs at least 3 trimmers in their arsenal. 
  • A sturdy rotary/guillotine, a portable trimmer for crops/traveling and one mini guillotine trimmer for cards or small papers.
  • Regular care and making sure that you don’t forcibly cut more papers or thicker cardstock on your particular trimmer will extend its life immeasurably. If used well, your Guillotine and Rotary trimmers can last you for over 10 years without any replacements. 
I do hope this post has helped you narrow your choices and pick a good trimmer. 

Thursday, November 13, 2014

Silhouette Cameo...Info Post

I thought its high time I did a post on the Silhouette Cameo...I've probably answered 50 mails and endless whatsapp conversations about this nifty gadget.

Simply put its a digital die cut machine. But it goes beyond that...If I sat down to list what all you can do with it, it would take me days. But lets get down to basics...

What you can cut - you can cut thick paper upto 250 gsm...I don't advocate 300 gsm because the machine is not built to handle that much pressure. But I have cut 300 gsm...but with a nifty trick. More on that later.
  • Scrapbook paper
  • Printer paper
  • Cardstock
  • Thin chipboard - like your cereal boxes 
  • Fabric
  • Vinyl
  • Adhesive paper
  • Transparency etc
This is vinyl I cut with my Silhouette and decorated my Cameo with! 

What else can it do - Replace the blade with a pen tool and you can fake a very fabulous handwriting with your Silhouette.

Print and Cut - Using it in conjunction with your printer, you can print the design and then feed that paper into your Cameo and it will cut around the design.  CAMEO does not print .. only cuts what you've printed... Saving you the trouble of cutting it by hand! Nifty eh!!  It does require a bit of software handling though...but easy once you get the hang of it.

What kind of designs you can cut - If you are a graphic artist or can dabble in Corel or Illustrator, you can cut any image on this earth. But if you are like me...you still can cut any image on earth.
Silhouette comes with a free software and free 50 designs to start you off. (The new Silhouette comes with 100 free designs )Then there is the Silhouette Online Store that has tens of thousands of images that you can download and use.
Most of these designs are priced at 99cents. During sales, they drop to 75 cents, sometimes 50 cents.
And if you buy a 3, 6,12 month subscription to the store the price per image can drop to 10cents too. Depending on your subscription.

Now- there is a Designer Edition of the software, which is basically an upgrade to the free software. It allows you to trace images, use .svg files and host of other features which I've yet to play with. But I use the tracing and svg feature the maximum.
What you can do is trace any vector and get a cut any image you can Google....There is a fabulous 8 part Youtube on tracing . Worth checking out.

This is free image I found on google and traced it to get the ECG line...had to play around with the file for while before I could get it correct...but it works!! 

Another set made with designs from Sihouette Store..the rays, the flowers and the banners...only the sentiments are stamped! 

There are host of graphic artists who design free svg files and you can download and use them. The internet and the Pinterest world is full of free designs that you can search.

What you can't do in Silhouette -
You can't cut glitter paper - Well actually you can cut American Crafts Glitter paper, but that will dull your blade faster. If you are cutting glitter paper, its better to keep that blade exclusively for glitter paper.
You cannot emboss. Not like you can in your die cut Machines. 
There is an engraving tool that is supposed to work, but I haven't tried it.

So what's the downside?
1. The first thing people crib is that they have to keep buying mats and blades. Its not like a darn trimmer where you have to buy a blade every 4 months...unless you are cranking 150 cuts a week...then you need a shitload of blades and mats.
I have had the same blade for almost 8 months...the same mat for 8 months...but I have a re-stick spray which I use every 3 months and the mat is as good as new.
Because I haven't used a whole lot of variety of cardstocks, my blade is good. If I used fibrous cardstock, my blade would have gone for a toss. I use just a standard few brands of cardstocks and that keeps my blade from wear and tear.


2. The learning curve for the Silhouette software is a little high, but not hard.
There are millions of tutorials and amazing amazing groups on Facebook that jump and guide you in a second. I love love those Groups. Absolutely free of negativity, and oh they love to share! Love those ladies!
I have always suggested to those who ever approach me about whether to buy the silhouette, download the software first. Its free to download even without the machine. Watch tutorials and play around with your software. Then buy the machine. Download the software here (scroll to the bottom and on the right is the Legacy Version. That is what I use. You can try the Basic Edition V3 if you are a little brave)
Coz I do know a lot of people who have just jumped and bought the machine and then don't use it because the software curve is high or they just don't know what to do with the machine once they get it.

Its not like your Big shot where you don't have to think. You need to know what you want to cut and how the design to look before you cut.
You need to figure out what kind of paper works for you, what kind of settings for the blade work for that paper.
If you think that's too much headache..its not for you.
Its kind of like getting to know someone ... what works, what doesn't work, how to trick it to get it to work for you...kind of like getting your boyfriend to do the work while making him think he is the boss!! hehe!!

So I'll wrap up this post here....and part 2 will have answers to whatever questions you have on this post!!

Toodles!! Till the next post!

P.s. I'm happy to answer questions and do some research. Because it widens my horizons, but please don't be so lazy that you just post the question and expect me to answer without you lifting a finger. If you want to buy a Cameo you at least need to know what the Cameo is. Read up, watch videos and use Google. After that if you have queries , feel free to ask me. I'll be happy to answer. But after all this big gyan you come and ask what is a Cameo....sigh....

P.P.S I am not going to compare this with other digital die cut machines...Simply because I own only the Silhouette Cameo. I'm not going to buy another one, so I'm not going to read up on The Brother Scan -n- Cut, The Cricut Expressions 2, The Cricut Explore etc. Unless you want to send me another one and have me compare!! I'm all game!! (Bwahhahaa!)

Thursday, September 19, 2013

Quick Tip on Embossing

I just thought I'd do a quick post on something that was bugging me...and am not sure if any of you had the same problems as me.

Its about the long time taken to melt the embossing powder by my Ranger's Heat Gun. This is my 2nd heat gun...previously I had used the Marvy Uchida and that would melt the powder in seconds...but it would also blow the powder all over my work surface. Which was a pain to clean afterwards! :(

So I decided to pick the Ranger's Heat It, (I got mine from Crafter's Corner) knowing it was a low noise, less fan speed kind of a gun.
But with that low fan speed came a drawback...it takes longer to melt the powder...the longer I used it, the more surfaces under it I melted. The reason is that, this is low temp heat gun....and the others are high temp melt heat guns...that is why this heat tool takes longer!

Thankfully I saw in one videos that I watch endlessly at nights (am a night owl and an insomniac) and it popped that this was what I needed.. , and I think this is my perfect solution. So I thought of sharing it with you!

What I did was take an useless corrugated cardboard sheet (see hoarding helps!!) and wrapped the piece in aluminum foil .. roughly an A4 size cardboard. And attached two wooden pegs to it...No metal and no plastic please...metal will heat up and plastic will melt...wooden pegs only..

What ever needs to be embossed, goes under the peg...so that it does not fly away...


And how it helps...when you're heating from top, the foil also gets heated and heats the paper from below...making the process of melting your powders faster....Its such a relief to have them melt faster....plus with the cardboard under it I don't melt any of my surfaces!! 

And your work gets done in half the time!!! just showing my pretty peg pins!! 
 
I would recommend this heat gun any day, its small, versatile, and makes so less noise than the other heat guns...plus this version works on the Indian voltage!! What more do I want!!

Hope this little tip helps you!!

Friday, September 13, 2013

Blending with Faber Castell pencils and Odorless thinners

I finally managed to shoot part 2 of my Coloring with Faber Castell Bi-colors. In part 1, I showed you how to blend those waxy pencils with a blender pencil. You can watch it here...But those blender pencils are not easy to come by.

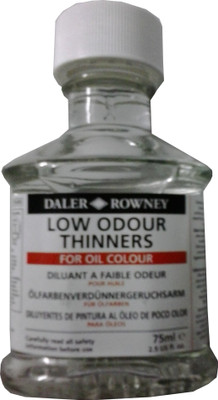
So I had set about searching for an alternative method, and it  took me so long, because I had to find local versions of  blending mediums...and I finally found it...and I love the results I got with it....What I am using are oil paint thinners...called OMS (odorless mineral spirits)

These thinners are called OMS because they are odorless...

Most of it is self explanatory when you see the video


I do have to give credit to Amy R of pariepaperink, from whose video, I got the idea of putting the sponge in a baby food jar.

Here are the samples that I colored in my video...I think I really like this method of blending the colors.
Even better than watercoloring!
What say?


And here are the links to the various products I have mentioned. The Daler Rowney low odor thinner


Another substitue for this can be the Camlin Distilled Turpentine, but which as I said stinks a ton...It has a strong pine odor...if you don't mind that..you can pick that up too at your local stationary store. The camlin turpentine wouldn't be called an OMS because it has a strong smell or odor. 
 I'm just sharing the pics coz sometimes you may forget the names of the product, but you'll always remember the pictures!! :p

Also there is the Winsor  Newton Sansodor ..same as the Daler Rowney product..I haven't been able to find it anywhere here, but if you do get that, that's a good option too.

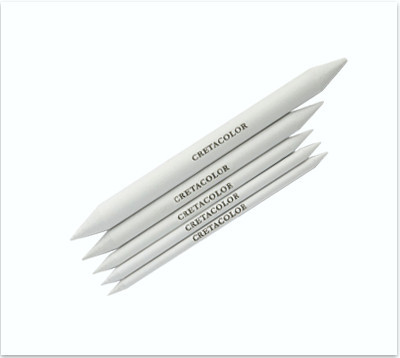
 Blending stumps/sticks (paper stumps) I have found mine in my local craft shop. If you can find, that's good, but you can also get the set from Creatacolor which is of a higher quality.  


Papers I use are Brustro 200 gsm (not 220 as I mention in the video) 

Hope you do try this method...
Feel free to leave your questions and of course, do leave your feedback. Which is what I thrive on!! 

So what next would you want to know...I'm searching for topics for my next videos....

Tuesday, July 30, 2013

Info Post | Faber-Castell Bi colors and a give-away

With the advent of Facebook, blogging certainly takes a backseat. If its out there on facebook, its done.
I am determined to not follow the path taken by everyone, but instead make my own way...and yet sometimes I end up following the herd!! (shame on me!)
Anyways, this video went up last week on facebook and never got around to posting here.

I do not really enjoy coloring, but because images call out to be colored and I cannot do a shoddy job. It either has to be perfect or none at all...and hence went deep into finding what will give me the best results within the limited resources locally. I remembered my Faber-Castell bi color pencils....and tried and what superb results!!


Since I'm on a bright color roll, I love going bright..but you can do soft too...Will be showing that soon in another video!! yeah...me and videos and talking!!! Scroll down for the video. 


These are the colors I used along with the Derwent Blender pencils. Which unfortunately are not easily available. I'm sure I've found an alternative to it. Waiting for it for reach me....its in transit. However...I did manage to snag the one set of Derwent blender and burnisher pencil I found here....its for 365 for anyone who wants to buy it. Email me if you want it. (tejal2210 AT gmail DOT com) SOLD

Here's the video if you missed it..

Or you can head to my You Tube Channel and watch it there.

And now if you've made it this far, I've got a mini challenge for you. Pick up whatever colors you've got....start coloring..make a project ( a card, a canvas, a tag, anything..not just the image) and link up below. I'll be giving away one set of the Bi-colors( set of 18) to one of you. If you've already got it, you can recommend a friend to whom I will send it.
Related Posts Plugin for WordPress, Blogger...