Tuesday, April 19, 2016

Review of DYMO 160 Label maker

Hello everyone...Another quick review for today!

I am usually not the one to spend on expensive gadgets, but when my DIY hacks fail, I end up buying them.

So in this post (Stamp Storage and Labeling), I swore, I would never  buy a label maker. And that I would use my regular printer and I could use all the fonts I can find.
 Well, I eat my words. I had a slight laziness issue with my first idea.

I had to wait till I had enough new stamps so that I could cover a full new sheet of label sticker. I could not print 2-3 labels and save the paper..I tended to waste the paper, or the printer would not accept smaller paper. If I wasn't lazy enough, I could have made it work..but sadly I am lazy.

So I went to search for label makers. Asked a hundred questions around the forums and finally narrowed onto something that would not make me regret, if it did not work.

So say hello to my new Label Maker DYMO 160. I got it from Amazon.in. Funny story...The local store here carries this same product for Rs.3800 and I was able to score this for Rs.1700 on Amazon.
Keep a watch on the prices, they fluctuate once in a while.
( I got from the vendor called "Amazingly Fab")

NMP - Source Google Search

Its small, fits into the palm of my hand.

Of course this is not as awesome the Brother P200 that Jennifer uses, but this will have to do for now.

There are a few pros and cons...but then not everything can be awesome right?? Then you have to pay the price for it too..I rather buy a few more stamp sets with the money I saved here..

Lets start with the negatives first..

  • Only one font.
  • It uses 6 AAA batteries. Which is a lot..if it was AA, could have been a bit cheaper.
  • Finding the cliparts and symbols, is a little tedious, but not impossible.
  • I wish there was a way to save the tape when printing, it puts a lot of white space in the 
  • front and back to the label..which is where I feel it wastes the tape.  
  • No instruction manual is provided. But it is easy to use right out of the box without a manual. You can download one from the website .

Now the Positives according to me

  • Prints two lines with the 12mm tape and 3/8th inch tape. (Score!!)
  • Same machine can accept 3 widths of tape.. 1/4th, 3/8th and 1/2 inch.
  • Has fonts from 8 point to 24 point.
  • Lots of symbols and cliparts are built in
  • The tape has split backing, so easier to remove.
  • Feather touch buttons
  • QWERTY keypad..makes it so much faster to type.
  • Refills tapes come in packs of 5, which costs about 350 per refill. {About 1750 for a pack of 5 & has 7m (about 23 feet)} of tape per new refill, the box comes with 3m of trial tape)
  • You can Underline, go italics, print Bold or print in boxes.

Basic but suffices for my use for now.

Since I am just starting to use it, I will update in a few days how it performs to my expectations.

And here is quick view of how it prints.


This works for me for now...so now, lets get labeling! :)

Hope this post is of some help to you...
Do not forget to check out my Stamp Storage post here


( affiliate link are used..in plain English it means, that every time you buy something using my link, I get a tiny bit of money..at no extra cost to you. And it helps me to continue finding such crazy stuff for you)

Tuesday, April 5, 2016

The best stamp Cleaner

Edited to Add

Now this post has a video too...
Do check out the video ... and while in there, you may get a sneak peek of something else coming in the next few days too..


 Or you can head over to my channel and watch it in HD.. here 
Links to find the cloth AMAZON

( affiliate link used..in plain English it means, that every time you buy something using my link, I get a tiny bit of money..at no extra cost to you. And it helps me to continue finding such crazy local stuff for you)

 
My older post
I had been meaning to share this hack/tip/product a long while ago, and never go around to it.
So finally I decided I should. Since I have now been using this for over 3 months.

I think most of us use either an old rag, an old T-shirt, wet wipes, baby wipes, scrubber, and what not to clean your stamps after inking. This one thing will make you throw away everything.

Of course you will still need your stamp conditioner, like Cleans it All or Hero Arts Ultra clean for cleaning off traces of Archival inks, or stazon but other than that dump everything.

I used to use a water spray mister and an old T-shirt and wet wipes before I found this. Tshirt used to leave stray fibres and wet wipes dry by the time I finish a project... and then another wet wipe.

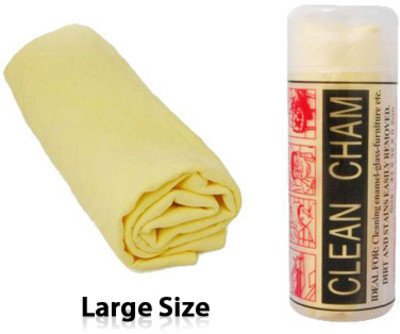
So what is it? Its a faux chamois cloth that is usually used to clean cars and is super super absorbent.

When you order, you will get a long roll stuffed in a plastic bottle. Almost the size of a baby towel.

It is packed slightly damp. Don't panic.  That's how its supposed to be kept. Cut it up into a tissue size or a small handkerchief size.
Find an old plastic box, any small box with a lid. And dump in it. That's it. That one small piece of faux chamois will last for almost 3-5 months depending how heavy you stamp. I used my Faux Chamois cloth for all my swatch samples. And I still use it. Its black, its dirty and it still cleans like a dream.

Why the box?
You need to keep the cloth moist for it to clean. If it becomes dry, it becomes like a stiff cardboard. Plus if you wipe and keep on your desk, the moist cloth may dampen your papers. So clean your stamps and dump it back into the box.

How to clean?
I simply wash with plain water and let it air dry. Once dry, it re-dampen it and put it back into the box. Where it will stay damp for almost a week.
Some times you may get a funny smell. If so, just let it air dry and the smell will go away.
You can even machine wash it if you want, but not necessary.

What Else??
Do you know when you use wet glue and it seeps out? And if you wipe with your hands, you get a long streak that well, shines once it dries? I hate that. So I tried once to clean with this cloth, and what do you know. The glue came off and there was no damn shiny streak left on the paper. Super happy me.

Anything more I want to add??
Oh yes, It cleans glitter off you table like magic. But getting the glitter off your cloth, well that's another story!!! (Bwahaha!!) 

So if I have convinced you to try this, jump right here and buy it. It's available in large and a small size. Check the size before you buy.
I got the large (66 X 43 X 0.2 cm) and it will last me a year for sure.
The small one is (43 x 32 x 0.2) Don't buy anything smaller than that size.

It does come in funky colors. On Amazon I see only yellow, but luckily I got a green one.

Run and get one...this is almost the same as the Absorber that the crafters in the US are using.

Thursday, March 17, 2016

Trio of PTI -The Sweet Life cards

I love my PTI - Sweet Life stamp set... The day I got it, I think I fell in love. My love for Altenew's Vintage flowers is diminishing by the day, because these are so so easy to line up...and the dies are so reasonable. PTI is 11$ vs Altenew's 26$ (so it does have 14 pieces but still !!!!!!!!)
Altnew is somehow making me more frustrated by the day, because I need them to line up perfectly, which does not happen even with a Misti (or I am loosing my vision! )

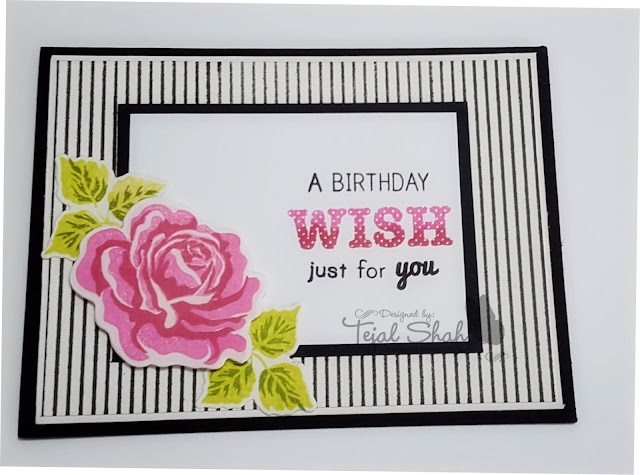
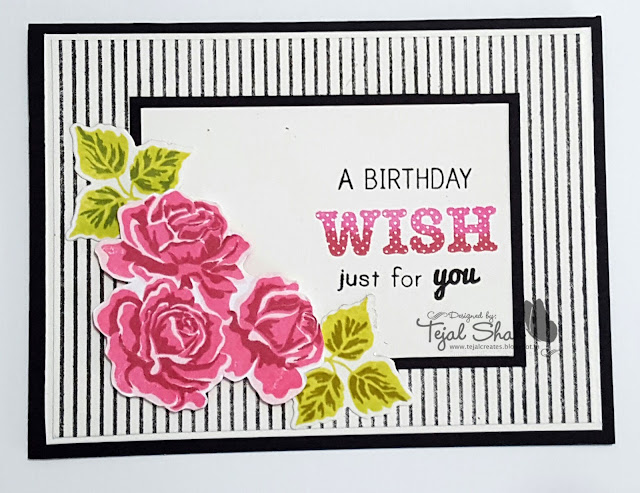
Anyhow, back to this trio of cards... I got inspired by one of Brandy's videos. And I took my measurements from her card. Except I just replaced the flower with one of my own. And instead of crimping my cardstock, I just stamped it! I love her channel...especially the old videos. These are so quick to mass produce.

I love the black and white with a pop of color...I am going to make a ton of these combinations soon! :)


Hope you like them...here is the supply list for those interested.


Background stamps - PinStripes and woodgrain background from MFT
Rose stamp - Papertrey ink - The Sweet Life and Die
Sentiment - Polka dot parade #12 - Papertrey ink
Inks - Memento Rose bud, Rhubarb Stalk, Angel Pink.
          PTI Simply chartruse, Memento Pear tart, Cottage ivy


Friday, March 11, 2016

Trio of Three amigos

Here is another set of cards that I had made in December - January.

I  had decided to make multiples while my set is still out. So I stamped a bunch of images and colored them, fussy cut them and then they were ready to be made into cards...So today I am featuring my Mama Elephant, Three Amigos stamp set.
I simply love the little rascals...and I love the little notes I can put into them.


All images are colored with Prismacolored pencils and Odorless thinner using paper stumps.
The background in this first card is made with distress inks. Cloud dies are PTI and the grass and the stitched hill die (actually a speech bubble) is from MFT.

This background is with distress inks and then I flicked some white paint across for some interest.
Stitched rectangle die is from Lil inkers.

This card has an embossed brick background (Darice if I am not wrong), circle die from Lil Inkers again.

So that was a quick share of my Mama Elephant Trio cards....

Let me know if you have any questions about products used. Or just leave a quick hello..I love hearing from you all!

Toodles, till we meet again!

Monday, March 7, 2016

You are Awesome!!


So I begin my posting in March...Trying to do a lot of intentional work here..and hopefully sticking to it. Wishful thinking does not work..Planning and writing it down, works!

So I know this girl called Priya Sondhi...an amazing girl, totally inspiring crafter and one of the most sweetest person I am lucky to call a friend ..So she sent this Aaaaamazing background stamp from MFT called All over Roses...(I still don't know how she knew it was on my wishlist) but once I got it, I had to play!!

I made two backgrounds with it.

You have already seen the card I made with the Pink in this post


 This is the other card I made.
The sentiment is from Lil Inkers, Embossed in Platinum Sparkle Powder.

Pretty simple, but had to wait till I sent it out to someone who made me shout out with joy!!
I am so blessed to know people like her. I am not a huge fan of surprises, because not everyone gets it right with what I love. I am pretty weird that way.
But this girl...oh!! She found out that I am a fan of Amish Tripathi, the author. And she just happened to know him. What are the odds!!
And she sends me the whole set of books, personally signed by him. I was on cloud nine that day...and to this day, every time I see those books I have a huge grin on my face!! Thank you Anang for being the one person whose surprise I totally loved!! Big big hugs to you girl!!


I have a lot of scheduled posts coming up...and many trios and duos of cards using a single stamp set..
As I am making more than one card with my supplies already out! Why not!!


Thursday, February 11, 2016

Quote Calendar Album


 Hello everyone! I am back!
It is like a rule..I will say I will post and then I don't. But my Bujo obsession is going to help me be regular. Bujo= Bullet Journal..which I thoroughly love more than my actual planner system. But let's talk about that in another post.

Today I am sharing another Standing Quote Calendar..a picture of which I shared on my page a few days ago. Rather than sharing each page separately, I made a quick collage of the front and the back pages...

Here is the album as it stands! I love the Wooden papers from Papericious .. really good papers...

Here is a collage of quotes on the front side of the album...Feel free to open the picture in a new tab and see it full size.Some of these are printed straight on Fabriano Cardstock. And some on my favorite Campap paper...(which is increasingly becoming hard to find!!)
I print everything on my Epson L210 printer, which has now become the Epson L220 .One year on, no need to refill yet.

These are the pictures of the back pages of the album. I have to say, I am truly blessed with patience. When I could not set up my cameo to cut that particular silhouette of the family, I printed and fussy cut it. Oh yes...it is fussy cut!!

There are some pages that I truly love, so sharing those separately. This is the last panel on the front facing pages..

 This is the absolute back page of the album.

Well that's it for now...I do hope you enjoyed a peek into the album ..
Waiting eagerly for your comments and reviews and questions!

Till we meet again!


Thursday, January 7, 2016

Hello 2016 ..

WOW!! That is some long absence. But I guess that's what happening...Social media is like microblogging and that's why I never feel the need to pen down my words here. But as New Year arrives, my resolutions also arrive..and one is to blog more often.

But some things deserve a blog post..and hence I am here..

To say hello to new challenge blog in town and to support a friend...
Say hello to Paru's Card Making Challenge Blog..

And here is the key for this first ever challenge...I hope I can keep up with it each month..


Here is my card...


This has everything new..well almost everything..

The "Awesome" script die is from Lil Inker's as well as the sentiment stamp. (NEW)
The background stamp is brand new, a RAK from Priya sondhi.. (how did you read my mind btw!!) I totally love it.. It is an MFT All over Roses background stamp (NEW)
And of course, my most beloved, the Stitched rectangle dies...Also from Lil Inker..(Can you say I shopped a lot at black friday??) :P (NEW)

I was  playing around with my stamp and heat embossing and new Nirmal watercolors..(if you are not on Facebook, you may not be up to date with my antics..will do a post soon on it!)


To the left is the Nirmal watercolors and to the right is distress ink colors. Distress inks that I used are Spun sugar and Picked Raspberry and for the greens, Mowed Lawn.

By accident, I got the most amazing Pearl finish embossing powder from Hero arts..it is white, but embosses shiny satiny look..and when you pair that with Wink of stella Glitter..it gives amazing results..

It may not be clear, just enlarge the pic to see it. It is the White Satin  Embossing powder from Hero Arts.

To finish up the card, I scribbled Wink of Stella Clear on the roses, as well the Awesome word. And coated the word die cut in Glossy Accents. I am sorry I do not have a better photo as this card is already with a dear dear friend!

If you need any more info, do not hesitate to ask me!

Hope to continue blogging..there are a ton of cards that I do need to post though!

See you soon!

Related Posts Plugin for WordPress, Blogger...