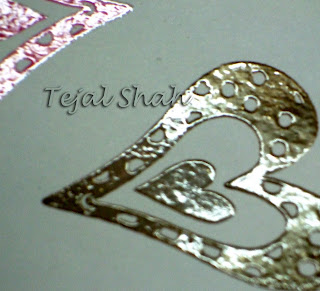
This is a really bad texture, unless I was going for texture but I wanted smooth finish. And from my researches, I came to know that the Ranger Heat it tool is the better one..it has a low blast of air, and is not noisy. Hmmm.. so those of you who are planning to put in a purchase, go for the Ranger Heat It tool.
And what about those that already have the other embossing tools?
You do what I did, heat the paper from underneath. It make sure that the powder doesn't fly everywhere. Just don't burn your fingers. (I did)
And now see the result. Flawless...I had to sit for a minute to admire the perfectness of this. Isn't this pretty?
So here's the comparison, on the left is the ruined version. It was on the Fabriano CS. Thinking that it might be because of the texture on the CS, I used the smooth Ivory sheets. The bottom pink heart on right is the same result. And the top two are the ones I heated from below.So there you go..my long experminets with my embossing gun and powder.
Hope this long post is of some use to at least someone. If there are any more questions, feel free to ask. I'll do all I can to help.


Great tutorial :) Now I know what to get next :p
ReplyDeletegreat tut! love both the looks!
ReplyDeletehey tejal. I use fabriano bianco and it has nice white colour. I also have stock of card papers. please mail me to know about it. and thanks for the tip.
ReplyDeleteThats a good news for me,bcoz i hav ordered ranger heat tool,lol,..thanks for the tip:)
ReplyDeleteI have an embossing buddy from StampinUp! and I dust my surface with it before I stamp on it and pour my embossing powder. That usually helps. Also try using the heat tool at an angle rather than straight up on your image. Just a suggestion, I always use mine that way.
ReplyDeletegreat tutorial ...love both the looks and this post was really helpful
ReplyDeleteNice tip. I have been embossing for way long and u would see it in most of my cards. what i do is let the heat tool get heated up well. Blow it away from you for some 20 seconds then use the heat and melt the embossing. The immediate heats would just melt your powder rather than blowing it off. Also dont keep the tool in one direction. Keep it moving slowly but move to next part only when the previous is completed melted else it gets blotchy. :) hope this helps :)
ReplyDeleteThanks for the tip, Tejal. I haven't done any wet embossing yet but I was trying the toaster method all afternoon yesterday. The first time I tried, I got the grainy effect; with practice, it got a little better. Anyway, since I don't use Versamark or a heat tool yet, I will keep these tips in mind till I do.
ReplyDeleteThanks a ton,
Smita
Hey Teju,
ReplyDeleteThat is a sure rescuer..... Will try it next time I heat emboss.... Thanks for that giveaway!!!!
Ash....
(http://hastkala-oceanichope.blogspot.com/)
Thanks for the tip Tejal, Well I had bought a ranger heat gun, but guess wht I connected it directly to the power supply here in India n the motor got burnt :(, anyway now I use local heat gun n its not so bad.....
ReplyDeleteglad you were able to find a technique that you were happy with!! Happy embossing!! :-)
ReplyDeletewow! a much needed tip as i just started embossing and was facing the same issue :D thanks :)
ReplyDelete